| POLICIES AND PROCEDURES
Our GPS
Units
Unit Hardware • Using
the GPS Unit on Your Handlebars • Overall
GPS Unit Operation • The
Map Page
The Route • Navigating
Via the GPS Unit • Limitations
|
|
|
|
|
|
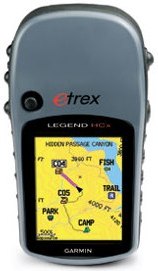
Most of the GPS units we own are the Garmin eTrex Legend
Cx GPS unit. We also own a couple Garmin eTrex Vista Cx, Garmin eTrex
Venture Cx, Garmin eTrex Legend HCx, and Garmin eTrex Vista HCx units
as well. All of these units are the same externally (as shown on the
Garmin eTrex Legend HCx at left) and operate almost identically.
When we initially did our research into the best GPS units to use
for cycling touring these units absolutely came out on top. We have
been using them extremely extensively since 2006 and are intimately
familiar with every aspect of them. We have directly navigated using
them on our own handlebars ourselves first hand and also used them
for various other outdoor activities including canoeing and hiking. |
Garmin eTrex Legend HCx
Click
Here for more information |
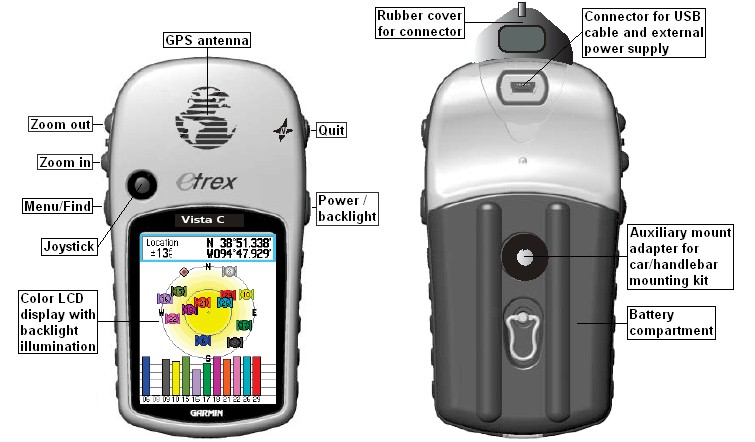
Unit Hardware
All units have a color display that shows
both your exact real-time position within about 20 feet and the route itself
overlaid on a base map, so it's
very easy to see your progress along the route. Each unit uses 2 AA standard
batteries and is waterproof in case of rain. They are also very rugged and
resistant against shocks and impacts - in fact a couple units have accidentally
fallen off the bike while riding and other than a few cosmetic scratches
they were not damaged at all. All units have a clip type mount on the back
to secure it to a handlebar mount and can be easily attached and removed
from the handlebar mount.

Using the GPS Unit on Your Handlebars
Attaching and Removing the GPS Unit from the Handlebar Mount
 To
attach the GPS unit to the handlebar mount, line up the handlebar
mount and the mount on the back of the GPS and slide the GPS down
onto the handlebar mount until it locks in place. To remove the GPS
unit from the handlebar mount press up on the release tab on the
back of the GPS unit and slide the GPS out of the handlebar mount.
|
Overall GPS Unit Operation
Replacing the Batteries
 To
open the back cover and replace the batteries, turn the metal ring on
the back cover 1/4 turn counterclockwise and pull the cover away. Replace
the old batteries, put the cover back on, and turn the metal ring 1/4
turn clockwise to lock it back in place. To
open the back cover and replace the batteries, turn the metal ring on
the back cover 1/4 turn counterclockwise and pull the cover away. Replace
the old batteries, put the cover back on, and turn the metal ring 1/4
turn clockwise to lock it back in place. |
Turning the Unit On and Off
To turn the GPS on, press and hold down the Power/Backlight key (the lower
button on the right side of the unit) until a tone sounds and the welcome
screen appears. To turn the unit off, press and hold down the Power/Backlight
key until a tone sounds and the unit's screen goes blank. You will
need to turn the unit off when not in use because it does not turn off
automatically and because we will only support cycling during daylight,
you will not need to use the unit's backlight function.
Welcome Screen
After the unit is initially turned on, a welcome screen and a welcome message
similar to this will appear:
Bicycle Illinois eTrex Unit 01
Reward if found
(877) 868-7455
(312) 342-5514
We will assign a specific GPS unit to each participant so make sure you
have the correct unit whenever you turn it on. Each unit will also be indentified
with a large number written in permanent marker on its back as well.
Satellite Signal Acquisition
The GPS units must be operated outside and will not work indoors because
they need a clear view of the sky in order to acquire the satellite signals
and the satellite signals are blocked by buildings.
 The
welcome screen will disappear after a few seconds and then go to the
satellite acquisition page. This page shows the status
of the unit acquiring and locking into the reception of different satellite
signals. The bars are empty as the unit is acquiring the satellite signal
and turn solid once the unit is locked into that satellite signal. Once
the unit has acquired at least three satellite signals it can determine
its location. Once this happens, the accuracy of your current position
will be displayed in the upper left hand corner of the page and your
specific latitude and longitude coordinates will be displayed in the
upper right hand corner. The
welcome screen will disappear after a few seconds and then go to the
satellite acquisition page. This page shows the status
of the unit acquiring and locking into the reception of different satellite
signals. The bars are empty as the unit is acquiring the satellite signal
and turn solid once the unit is locked into that satellite signal. Once
the unit has acquired at least three satellite signals it can determine
its location. Once this happens, the accuracy of your current position
will be displayed in the upper left hand corner of the page and your
specific latitude and longitude coordinates will be displayed in the
upper right hand corner. |
The Map Page
 After
the unit has acquired enough satellite signals to determine your specific
location, you will need to press the Quit key (the upper button on the
right side of the unit) to go to the map page. Geographic features such
as roads, parks, railroads, and bodies of water and their names are indicated
on the map (depending on the current map zoom level) and the map scale
is indicated in the lower left corner of the map. You should consider
the map page to be your "home" page. After
the unit has acquired enough satellite signals to determine your specific
location, you will need to press the Quit key (the upper button on the
right side of the unit) to go to the map page. Geographic features such
as roads, parks, railroads, and bodies of water and their names are indicated
on the map (depending on the current map zoom level) and the map scale
is indicated in the lower left corner of the map. You should consider
the map page to be your "home" page. |
Your Current Location
Your exact current position will be indicated at all times by a black diamond
overlaid on top of the map. If you go to the map page before the unit has
fully acquired enough satellite signals, a red question mark will blink
over the black diamond until the unit determines your specific location.
Zooming In and Out and Panning
You can use the zoom out and in keys (the upper and middle buttons on the
left side of the unit) to view a smaller area with greater detail or a
larger area with less detail on the map. You can also use the little
joystick on the front of the unit to pan (move) the map up, down, left
and right from your current position. When you are panning
the map, a white arrow will appear as a cursor. To get back to the home
map page when panning, press the Quit key. If you zoom in or out quickly
or pan far away from your current location, it may take a little while
for the map data to load.
Battery Power Status
To see how much battery power is remaining, briefly press and release the
Power/Backlight key and a status bar will come up on the bottom of the
map page. A battery status indicator will be at the far left of the status
bar. When the battery is full there will be four bars and as the battery
wears out these bars will progressively disappear. When the batteries are
almost empty no bars will remain. In addition, when the batteries are almost
empty a warning message will appear and the unit will beep. You should
definitely replace the batteries at this point because the unit will not
operate for very much longer past this point. The status bar will automatically
disappear after a few seconds.
Lost Satellite Reception
If for some reason the unit temporarily loses the satellite signal, a message
will come up on the screen that says "Lost Satellite Reception [ENTR]".
To clear this message, press down on the middle of the joystick
(the "Enter" button).
Getting Back to the Map Page
If you hit a button by accident or don't know what happened, press
the Quit key until the original view on the map page reappears. If for some
reason pressing the Quit or Enter (in case of lost satellite reception) buttons
doesn't fix the problem please DO NOT JUST PUSH BUTTONS because this
may make the problem worse! Instead, please call us and we will be happy
to instruct you on what to do.
The Route
The Route
The route is indicated by a dark blue dotted line.
Waypoints and Waypoint Nomenclature
All important locations on the route, such as rest stops, main lodging sites,
supported hotels, starting and ending locations, etc. will be indicated
with a waypoint.
Waypoints will be indicated by the number of that location on the route
followed by the name of that location so that they are displayed on the GPS
unit in the order they actually ridden. The starting location(s) of the ride
will be indicated by a "0" and the starting town. For example
the waypoint "0Moline" is the location of the start of the ride
in Moline and the waypoint "2Amboy" is the second stop of the
day at Amboy. Main lodging sites will be followed by the letters "ML" and
supported hotels will be followed by the letters SH when necessary. For example
the waypoint "7ChicagoSH" is the supported hotel in Chicago.
On single day rides, waypoints will only have one number. On multi-day rides,
waypoints will also be indicated by two numbers – the first one is
the riding day and the second one is the number of that location on the route.
For example the waypoint "41Neoga" is the first rest stop on
the fourth riding day at Neoga and is before "42Mattoon", the
next rest stop that day. When a location is both the ending point for the
previous day's ride and also the starting point for the next day's
ride it will be indicated by the number of the next day's ride and
a "0". For example the waypoint "30CentraliaML" (the
Centralia main lodging site) is both an ending location for riding day 2
and a starting location for riding day 3.
Navigating Via the GPS Unit
Seeing Your Movement
When you are moving, the black diamond will point in the direction in which
you are travelling. Generally, it is much easier to navigate using the
GPS units when you are moving than when you are stopped. This is because
when you are moving you can actually see what direction you are going by
the direction the diamond is pointing but when you are stopped the triangle
tends to bounce around a little because of the varying satellite signals.
So if you need to get your bearings you should start moving in one direction
to see which direction you are actually travelling. You don't need
to ride to do this however, normal pace walking works just fine.
Following the Route
In order to follow the route, you simply need to ride so that your black
diamond follows the dotted line indicating the route – it's
that easy. If it seems like the route is going off a road it probably is
going onto a bike path so keep your eyes open for one.
The diamond may not necessary be exactly right on top of the dotted line
at all times, it may be off by a few feet due to varying satellite signals,
but it will never be off by more than twenty feet at most with proper satellite
reception. As you ride, the map will automatically adjust itself to always
be centered on your location at all times (unless you are panning the map,
in which case the map will stay locked on the position of the white arrow).
When using the GPS unit to follow the route, you still do have to use a
little bit of common sense. We recommend frequently zooming in and out and
panning around in order to get a better idea of your location in relation
to other route locations (rest stops, starting and ending location, etc.)
This includes how far you have to ride until next thing you need to do (such
as turning), what's coming up down the road, and also how far you have
ridden from the previous rest stop and how far it is until the next one.
We also strongly recommend watching the GPS scale and watching the names
of cross streets.
Supplementary Road Markings and Orange Flags
We will still paint road markings and put orange flags up at a limited number
of places on the route where it can be tricky and confusing to follow on
the GPS, such as at triple points where the route does not proceed in only
one direction and can become confusing to follow, such as at the start/end
of options and doublebacks or where the route crosses over itself. So when
you reach one of these points look on the ground for our road markings
to get more information about how to properly proceed.
Limitations
Even though our GPS units work fantastically for on road cycling navigation
they still do have few limitations.
It will still be entirely your responsibility to watch the screen and pay
attention to the route and to not "sleep at the wheel". By far
the biggest misconception people have about these GPS units is that they
will "tell" you when to turn, such as a beep, having a box flash
up, some lady's voice saying "right turn in half a mile",
or anything else like that. While this may be the case if travelling in a
car, these units can not and WILL NOT TELL EVER you when to turn.
- Click Here for the technical reasons why these units will not indicate upcoming
turns or actions.
In addition, these GPS units cannot tell you on route distances. For example,
they cannot tell you how far you have already ridden or how much longer you
still need to ride on the route from your current location either to the
next rest stop or to the end of the ride. You will still need to rely on
your cycle computer and the on road cue sheets and maps for that information. |